Three.js tutorial for beginners from Codingcompiler. Here in this
HTML5 and WebGL
First I will touch on the positioning of HTML5 briefly. HTML5 is the successor language of HTML4 and XHTML which was mainstream in the past web page creation language, and the draft was compiled in 2008 and by 2014 formulation is advanced for the official recommendation to each web browser company It is. Although HTML5 is still in the “draft” stage in January 2012, the specification is also in a fluid preparation stage, very much attention is gathered from both the development side and the user side.
One of the major reasons is to respond to the diversification of information terminals by the emergence of smartphones such as iPhone and Android . In other words, it is expected to make an important contribution to cross-platformization of various WEB contents.
Until the appearance of smartphones, FLASH provided by Adobe is in the standing position of the de facto standard as the execution environment of multimedia contents combining moving images and audio, and by introducing FLASH plug-in, various In fact it was possible to browse on OS and web browser, so the cross platform execution environment was practically realized, but this cross platform environment collapsed by Apple which does not allow FLASH to run on iPhone (or iPad). Among them, it was HTML5, the next generation WEB page creation language compiled by W3C, a WEB standards organization, that brought forth the arrow of Shirane as a new cross platform execution environment.
HTML5 can handle moving images, audio, and even bitmap data directly from the language for simply structuring sentences It evolved like. In other words, it is possible to realize a cross platform environment in many environments including smart phones without introducing plug-in etc.
Building a cross platform environment for this WEB content is the reason why web browsers are introducing HTML5 specifications that are still only in the “draft” stage, as a result of the important and prompt request in the WEB industry.
HTML5 is available on a smartphone web browser which is nearly 100% usable (even for personal computers the latest version of each web browser is available). By the way, HTML5 is not a standalone but by combining CSS 3 which specifies the visual appearance of information and JavaScript which is a scripting language implemented by web browser, it will show its true value.
WebGL Examples
A very famous example of WebGL is ” Aquarium ” announced by Human Engines and Gregg Tavares at the end of 2010 . The figure below is the screen capture, but please take a look at the browser that supports WebGL.
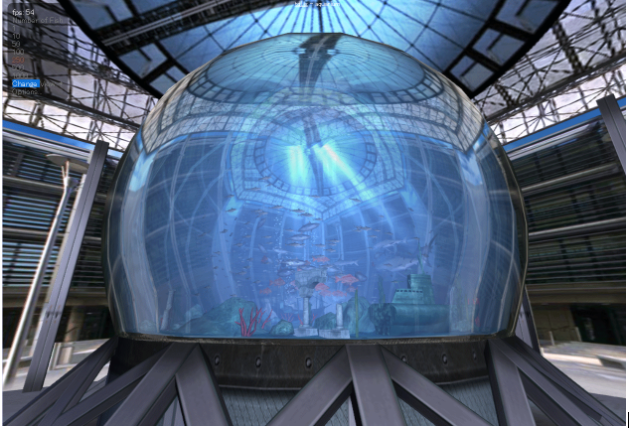
I am amazed that such a precise 3-dimensional graphic works with a web browser without being lost. Recently, three dimensional drawing library “ChemDoodle” and three-dimensional anatomical chart “BIODIGITAL HUMAN” emphasizing practical aspects such as learning are also appearing one after another. The trend of digitization of teaching materials discussed in the education industry in recent years is thought to be further advanced by the appearance of such digital contents.
How to use WebGL
WebGL can be used by reading the matrix computation library “glMatrix.js” for WebGL described in Javascript and describing a predetermined program. At the end of 2009, Mr. Giles announced a tutorial ” Learning WebGL ” for using WebGL, making the procedure for using WebGL easier to understand. Although it is possible to draw WebGL natively, it is possible to draw as much as a high-performance game dedicated machine, but even if it is said that, very difficult situation continued unless it was a person familiar with OpenGL. Meanwhile, the library ” Three.js (Mr. dooob) ” aiming to be able to use WebGL easily at the end of 2010 was announced. Three.js is extremely easy to use and very popular as it makes it easy to try WebGL.
Three.js can also be used by reading “Three.js” written in JavaScript. We will also use Three.js to render 3D physical simulation, which is the object of this paper. In addition to Three.js, WebGL’s library includes ” J3D ” and ” SceneJS “, and in Japan it is ” gl.enchant.js beta version (Ubiquitous Entertainment Inc.)“.
What is Three.js?
Three.js is a JS 3D Engine
- github.com/mrdoob/three.js
- Lightweight
- Easy to use
- Batteries included
- WebGL renderer (our focus today)
- Also has Canvas and SVG renderers
Download Three.js
To download Three.js , access ” mrdoob / three.js – GitHub ” and click “ZIP” in the figure below to download all the files. When using Three.js, only “Three.js” in the “build” folder is sufficient, but the sample is enclosed, so when you look at it in your spare time, inspiration comes u.
Please copy “Three.js” in the “build” folder to the working folder. You are ready.
Check operation of Three.js
After checking the operation of Three.js, draw a rectangular parallelepiped. Please start up the text editor, copy & paste the next source, and save it in the working folder.
Three.js Tutorial For Beginners
Sample Three.js Tutorial: torial1.html (viewpoint and light source setting, cube drawing)
 <!DOCTYPE html><font></font>
<html><font></font>
<head><font></font>
<meta charset="UTF-8"><font></font>
<title>Three.js チュートリアル1</title><font></font>
<script src="Three.js"></script><font></font>
<style type="text/css"><font></font>
div#canvas-frame{<font></font>
  border: none;<font></font>
  cursor: pointer;<font></font>
  width: 600px;<font></font>
  height: 600px;<font></font>
  background-color: #EEEEEE;<font></font>
}<font></font>
</style><font></font>
<script><font></font>
  var renderer;<font></font>
  function initThree() {<font></font>
    width = document.getElementById('canvas-frame').clientWidth;<font></font>
    height = document.getElementById('canvas-frame').clientHeight;  <font></font>
    renderer = new THREE.WebGLRenderer({antialias: true});<font></font>
    renderer.setSize(width, height );<font></font>
    document.getElementById('canvas-frame').appendChild(renderer.domElement);<font></font>
    renderer.setClearColorHex(0xFFFFFF, 1.0);<font></font>
  }<font></font>
  <font></font>
  var camera;<font></font>
  function initCamera() {  <font></font>
    camera = new THREE.PerspectiveCamera( 45 , width / height , 1 , 10000 );<font></font>
    camera.position.x = 100;<font></font>
    camera.position.y = 20;<font></font>
    camera.position.z = 50;<font></font>
    camera.up.x = 0;<font></font>
    camera.up.y = 0;<font></font>
    camera.up.z = 1;<font></font>
    camera.lookAt( {x:0, y:0, z:0 } );<font></font>
  }<font></font>
  var scene;<font></font>
  function initScene() {    <font></font>
    scene = new THREE.Scene();<font></font>
  }<font></font>
  var light;<font></font>
  function initLight() {  <font></font>
    light = new THREE.DirectionalLight(0xFF0000, 1.0, 0);<font></font>
    light.position.set( 100, 100, 200 );<font></font>
    scene.add(light);<font></font>
  }<font></font>
  var cube;<font></font>
  function initObject(){   <font></font>
    cube = new THREE.Mesh(<font></font>
         new THREE.CubeGeometry(50,50,50),                //Shape setting
<font></font>
         new THREE.MeshLambertMaterial({color: 0xff0000}) //Material setting
<font></font>
    );<font></font>
    scene.add(cube);<font></font>
    cube.position.set(0,0,0);<font></font>
  }<font></font>
  function threeStart() {<font></font>
    initThree();<font></font>
    initCamera();<font></font>
    initScene();    <font></font>
    initLight();<font></font>
    initObject();<font></font>
    renderer.clear();  <font></font>
    renderer.render(scene, camera);<font></font>
  }<font></font>
</script><font></font>
</head><font></font>
<font></font>
<body onload="threeStart();"><font></font>
<div id="canvas-frame"></div><font></font>
</body><font></font>
</html><font></font>
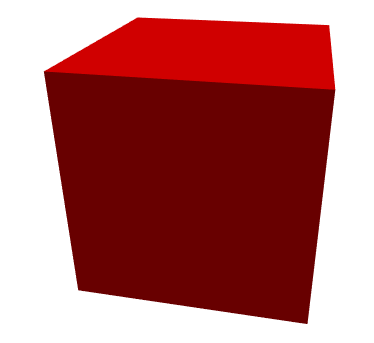
The execution result is as follows. You can see that red rectangular parallelepiped is drawn when browsed by web browser compatible with WebGL.
The procedure for drawing with Three.js is as follows.
- Preparing the canvas frame
- Initialization of Three.js (initThree ())
- Preparing the camera (initCamera ())
- Scene preparation (initScene ())
- Preparing the light source (initLight ())
- Preparing objects (initObject ())
- Execution of rendering (threeStart ())
Three.js – Creating a scene
The goal of this section is to briefly introduce three.js. We start by creating a scene with a rotating cube. If you have questions or need help, you can see an example at the bottom of the page.
Before the start
Before using three.js, you need a place to display. Save the following HTML file to your computer, copy the three.js file to the js/ directory, and open the HTML file in your browser.
<!DOCTYPE html>
<html>
 <head>
 <meta charset=utf-8>
 <title>My first three.js app</title>
 <style>
 body { margin: 0; }
 canvas { width: 100%; height: 100% }
 </style>
 </head>
 <body>
 <script src="js/three.js"></script>
 <script>
 //Our JavaScript code will be written here
 </script>
 </body>
</html>
in this way. All subsequent code will be written in the empty <script> tag above.
Create a Scene
To display objects through three.js, we need three things: scene, camera, and renderer to render the scene through the camera.
var scene = new THREE.Scene();
var camera = new THREE.PerspectiveCamera( 75, window.innerWidth / window.innerHeight, 0.1, 1000 );

var renderer = new THREE.WebGLRenderer();
renderer.setSize( window.innerWidth, window.innerHeight );
document.body.appendChild( renderer.domElement );
Take a moment to explain what happened. We have set up the scene, camera and renderer.
There are several different cameras in three.js. Now we are using PerspectiveCamera.
The first attribute is the field of view . FOV refers to the range of scenes of the display at any time. In degrees.
The second is the aspect ratio . The aspect ratio of the element is generally used, otherwise you will find the result is like putting an old movie on a widescreen TV – the image looks like it has been squeezed.
The next two properties are near (near) and far (far) . That is, an object whose distance value from the camera is larger than the far value or smaller than the near value is not rendered. Now you don’t have to think about this, you can use other values in your application to get better results.
Next is the renderer. This is where magic happens. In addition to the WebGLRenderer we use here, there are several other ways of three.js. Other methods are usually used as a downgrade feature for users who use older browsers or who are unable to use WebGL for some reason.
After creating the renderer instance, we also need to set a size, which is the size of the application display. If you want to fill the display area, you can use the width and height of the display area directly – in this case, the width and height of the browser window. For performance-intensive applications, you can set a smaller value with setSize , such as window.innerWidth/2 and window.innerHeight/2 , which will reduce the application’s render size to half.
If you want to keep the size of the application displayed, but render it at a lower resolution, you can set updateStyle (the third parameter) to false when calling setSize . For example, setSize(window.innerWidth/2, window.innerHeight/2, false) will render the application at half the resolution because your <canvas> width and height are 100%.
Last but not least, we need to add the renderer element to our HTML document. That is, the renderer is used to display the <canvas> element of the scene.
“No problem, but what about the cube?” Now we will make it up.
var geometry = new THREE.BoxGeometry( 1, 1, 1 );
var material = new THREE.MeshBasicMaterial( { color: 0x00ff00 } );
var cube = new THREE.Mesh( geometry, material );
scene.add( cube );

camera.position.z = 5;
To create a cube, we need a BoxGeometry . It is an object that contains all the vertices and faces of the cube . We will continue to discuss this later.
In addition to geometry, we also need to color it with material. Three.js comes with several materials, and we will use MeshBasicMaterial . All materials are an object that contains many properties. For simplicity, we use 0x00ff00 as the color attribute, which is green. Similar to the color values in CSS or Photoshop ( hex colors ).
The third thing we need to do is to create a Mesh . A mesh is an object that needs to specify a geometry and a material that is applied to the geometry. We can then add this mesh object to our scene so that we can move the mesh object freely in the scene.
By default, when we call scene.add() , the object is added to the coordinates (0,0,0) . This causes the camera and cube to overlap each other. To avoid this, we just need to move the camera out.
Rendering Scene
If you copy the above code into the HTML file we created earlier, you will find that there is nothing. Because in fact we didn’t render anything. So, we need to do a so-called rendering or animation loop operation.
function animate() {
 requestAnimationFrame( animate );
 renderer.render( scene, camera );
}
animate();
The above code will create a loop that causes the renderer to draw the scene each time the screen is refreshed (if it is a normal screen, this means 60 executions per second). If you are new to web games, you might say “Why don’t we use setInterval?“ Actually – we can use it, but with requestAnimationFrame better. Perhaps most importantly, when the user switches to another tab in the browser, requestAnimationFrame will pause, so the browser’s valuable computing resources and power will not be wasted.
Let the Cube Move
If you write the above code into the HTML file we created most, you should see a green square. It can be made interesting by rotating it.
Add the following code before the renderer.render call in your animate function :
cube.rotation.x += 0.1;
cube.rotation.y += 0.1;
The above code runs once per frame (usually 60 times per second) and adds a nice rotation animation to the cube. Basically, any movement or change you want must be looped through the animation while the application is running. Of course, you can call other functions inside the animation loop, so your animate function won’t be too long.
Result
Congratulations! Now you have completed your first three.js application. Simply put, there is always a beginning in everything.
The complete code is as follows. Study it and you will have a better understanding of how it works.
 <html>
 <head>
 <title>My first three.js app</title>
 <style>
 body { margin: 0; }
 canvas { width: 100%; height: 100% }
 </style>
 </head>
 <body>
 <script src="js/three.js"></script>
 <script>
 var scene = new THREE.Scene();
 var camera = new THREE.PerspectiveCamera( 75, window.innerWidth/window.innerHeight, 0.1, 1000 );

 var renderer = new THREE.WebGLRenderer();
 renderer.setSize( window.innerWidth, window.innerHeight );
 document.body.appendChild( renderer.domElement );

 var geometry = new THREE.BoxGeometry( 1, 1, 1 );
 var material = new THREE.MeshBasicMaterial( { color: 0x00ff00 } );
 var cube = new THREE.Mesh( geometry, material );
 scene.add( cube );

 camera.position.z = 5;

 var animate = function () {
 requestAnimationFrame( animate );

 cube.rotation.x += 0.1;
 cube.rotation.y += 0.1;

 renderer.render(scene, camera);
 };

 animate();
 </script>
 </body>
</html>
Three.js – Import via Modules
Although importing three.js via a script tag is a great way to get up and running quickly, there are some drawbacks to long-term projects, such as:
- You must manually get and import a copy of the library as part of the project source code
- Updating the version of the library requires manual operation
- When checking in a new version of the library, your version control comparison will be confused by the many lines of the build file.
You can avoid these limitations by using a dependency management tool like npm, you just need to download the required version of the library and import it to your machine.
Installed via npm
Three.js has been released as an npm module, see: npm . This means you can just import three.js into your project by running “npm install three”
Import module
If you package your files using tools like Webpack or Browserify , you can “package all dependencies and use require(‘modules’) in your browser.”
You should now be able to import the module into your source file and continue to use it as usual.
var THREE = require('three');

var scene = new THREE.Scene();
...
You can also take advantage of the ES6 import syntax :
import * as THREE from 'three';

const scene = new THREE.Scene();
...
Or you just want to import selected parts of the three.js library, such as Scene:
import { Scene } from 'three';

const scene = new Scene();
Precautions
It is currently not possible to import files in the “examples/js” directory in this way. Because some files rely on the global namespace to pollute THREE. See Transform `examples/js` to support modules #9562 for more information.
Three.js Browser support
Overview – Three.js can render your scenes using WebGL on all modern browsers. For older browsers, especially Internet Explorer 10 and below, you may have to fall back to one of the other renderers (CSS2DRenderer, CSS3DRenderer, SVGRenderer, CanvasRenderer). In addition, you may have to introduce some polyfills, especially when using files in the /examples folder.
Note: If you don’t need to support older browsers, other renderers are not recommended because they are slower and support fewer features than WebGLRenderer.
WebGL-enabled browser
Google Chrome 9+, Firefox 4+, Opera 15+, Safari 5.1+, Internet Explorer 11, and Microsoft Edge. You can find which browsers support WebGL on Can I use WebGL.
JavaScript language features and Web APIs used by Three.js
Here are some of the features used by three.js. Some of these features may require additional polyfills.
| Characteristic | Scope of use (Translator’s Note: refers to the directory used in the source code) | Module |
| Typed Arrays | Source | BufferAttribute,BufferGeometry |
| Web Audio API | Source | Audio,AudioContext,AudioListener |
| WebVR API | Source | WebVRManager, etc. |
| Blob | Source | FileLoader, etc. |
| Promise | Examples | GLTFLoader,GLTF2Loader,WebVR,VREffect |
| Fetch | Examples | ImageBitmapLoader |
| API file | Examples | GLTFExporter, etc. |
| API URL | Examples | GLTFLoader, etc. |
| Pointer Lock API | Examples | PointerLockControls |
Polyfills
Simply import polyfills according to your requirements. Take IE9 as an example, you need at least polyfill the following features:
- Typed Arrays
- Blob
Suggested polyfills
WebGL compatibility check
Although WebGL compatibility issues are becoming less and less trivial, some devices or browsers still cannot support WebGL. The following methods allow you to detect if WebGL is supported and give a hint when you can’t support WebGL.
Add https://github.com/mrdoob/three.js/blob/master/examples/js/Detector.js to your javascript and run the following code before you try to render.
 if (Detector.webgl) {
    // Startup method or other initialization method
    animate();
} else {
    var warning = Detector.getWebGLErrorMessage();
    document.getElementById('container').appendChild(warning);
}
How to run things locally
If your program only has procedural geometries and does not load the material, then the web page can be double-clicked on the HTML file and you can see the results of the run directly in the browser (you will see file:/ in the address bar ) //yourFile.html ).
Load content from an external file /h2>
If you load a model or texture from an external file, loading from the file system will fail with a security exception due to the browser’s same origin policy security restrictions.
There are two ways to solve this problem:
- Modify your browser to the local security policy document, byfile:///yourFile.htmlaccessing the page.
- Using a local Web server, byhttps://localhost/yourFile.htmlaccessing the page.
If you use the first method, you should be aware that if you use the same browser for normal Internet behavior, there may be some security risks. Therefore, you may wish to create a separate browser configuration or shortcut for local development only to ensure security. I will introduce them one by one.
Use a local web server:
Many programming languages have built-in simple HTTP servers. However, they are generally not as full-featured as Apache or NGINX . Even so is enough to test your three.js app.
Node.js server
Node.js has a simple HTTP server package. The installation command is as follows:
npm install http-server -g
Jump to your working directory and run it with the following command:
http-server . -p 8000
Python server
If you have Python installed , you can run it with the following command (from your working directory):
//Python 2.x
python -m SimpleHTTPServer

//Python 3.x
python -m http.server
This allows access to the files in the current directory via the 8000 port of the local host, ie in the address bar:
Ruby server
If you have Ruby installed, you can run the following to get the same result:
ruby -r webrick -e “s = WEBrick::HTTPServer.new(:Port => 8000, :DocumentRoot => Dir.pwd); trap(‘INT’) { s.shutdown }; s.start”
PHP server
Starting with version 5.4.0, PHP also has a built-in web server, which runs with the following commands:
php -S localhost:8000
Lighttpd
Lighttpd is a very lightweight, universal web server. We will show you how to install it using HomeBrew on OSX. Unlike the other servers discussed here, Lighttpd is a mature server for production environments.
- Install it via homebrew, the command is as follows:brew install lighttpd
- Create a configuration file called lighttpd.conf in the directory where you want to run the web server. Here is an example (example)
- In the conf file, change server.document-root to the directory where you want to serve the file.
- Start it lighttpd -f lighttpd.conf
- Navigate to https://localhost:3000/ and it will serve the static files in the directory of your choice.
Change local file security policy
Safari
Use the Preferences panel to enable the Develop menu, in Advanced -> Show Demo menu in the menu bar.
Then in the Safari “Develop” menu, select “Disable local file restrictions”. It’s also worth noting that the Safari browser has weird performance on the cache, so if you are using Safari Edit & Debug, it is recommended to enable “Disable Cache” in the same menu. “Options.
Chrome
First turn off all running Chrome instances, with a focus on “all.”
In Windows, you can use the Windows Task Manager to check for Chrome instances. Also, if you see the Chrome icon in the system tray, you can open its right-click menu and click “Exit”. This should close all Chrome instances.
Then use the command line flag to launch the Chrome executable:
chrome –allow-file-access-from-files
On Windows, the easiest way is to create a special shortcut (right-click shortcut -> Properties -> Target) with the above command line flag added.
On Mac OSX, you can use
open /Applications/Google\ Chrome.app –args –allow-file-access-from-files
Firefox
- In the address bar, type about:config
- Find the security.fileuri.strict_origin_policyparameter
- Set it to false
There are other simple options for discussion on Stack Overflow .
Three.js – Drawing Lines
Suppose you want to draw a line or a circle instead of a wireframe Mesh. First, you need to set the renderer , scene and camera (see the Creating a scene section).
code show as below:
var renderer = new THREE.WebGLRenderer();
renderer.setSize( window.innerWidth, window.innerHeight );
document.body.appendChild( renderer.domElement );

var camera = new THREE.PerspectiveCamera( 45, window.innerWidth / window.innerHeight, 1, 500 );
camera.position.set( 0, 0, 100 );
camera.lookAt( new THREE.Vector3( 0, 0, 0 ) );

var scene = new THREE.Scene();
Next you need to define the material Material. For lines, we have to choose between LineBasicMaterial and LineDashedMaterial . code show as below:
// Create a blue LineBasicMaterial material
var material = new THREE.LineBasicMaterial( { color: 0x0000ff } );
Once the material is defined, you need a Geometry or BufferGeometry with
var geometry = new THREE.Geometry();
geometry.vertices.push(new THREE.Vector3( -10, 0, 0) );
geometry.vertices.push(new THREE.Vector3( 0, 10, 0) );
geometry.vertices.push(new THREE.Vector3( 10, 0, 0) );
Note that lines are drawn between each pair of consecutive vertices, but not necessarily between the first and last (ie, the line segments are non-closed).
Now you have vertices and a material that can make up two lines, and you can combine to create a line.
var line = new THREE.Line( geometry, material );
Finally, add the resulting line to the scene and call render .
scene.add( line );
renderer.render( scene, camera );
You can now see an up arrow made up of two blue lines.
Three.js – Creating text
Many times you may need to use text in a three.js application – this section will cover some common methods.
1. DOM + CSS
Using HTML is usually the easiest and fastest way to add text. This is the method used to add descriptive text in most three.js examples.
You can add content to one
<div id=”info”>Description</div>
Use CSS tags for absolute positioning at the same time, and set them to be on top of other elements by setting the z-index attribute, especially when running three.js in full screen.
#info {
 position: absolute;
 top: 10px;
 width: 100%;
 text-align: center;
 z-index: 100;
 display:block;
}
2. Draw the text onto the canvas and use it as a Texture
Use this method if you want to simply draw text on a plane in a three.js scene.
3. Create a model in your favorite 3D application and export to three.js
Use this method if you prefer to use a 3D application (create a model) and import a (created) model into three.js.
4. Procedural text geometry
If you prefer to work directly with three.js, or create procedural dynamic 3D text geometry, you can create a mesh whose geometry is an instance of THREE.TextGeometry:
new THREE.TextGeometry( text, parameters );
In order for this to work, you need to set an instance of THREE.Font on the “font” parameter of the TextGeometry. For more information on how to do this, a description of each acceptable parameter, and a list of JSON fonts provided with the three.js distribution, see the TextGeometry page.
Example
WebGL / geometry / text
canvas / geometry / text
WebGL / shadowmap
If the Typeface is not available, or if the font you want to use does not exist, there is a Python script tutorial for Blender that can be exported to a JSON format supported by three.js: https://www.jaanga.com/2012/ 03/blender-to-threejs-create-3d-text-with.html
Useful Three.js Resources
Here are some link sets that may be helpful in the process of learning three.js.
In addition, Mr.Doob maintains a three.js related link set on Google+. Click here for details.
Three.js Help Forum
Three.js officially uses Stack Overflow as a help channel. If you need any help, you can visit this forum. Please do not mention the issue on Github.
Three.js Tutorials and Courses
Getting started with three.js
Advanced Articles and Courses on Three.js
- Collection of tutorials by CJ Gammon.
- Glossy spheres in three.js.
- Interactive 3D Graphics – Free tutorial on basic 3D graphics on Udacity, using three.js as a development tool.
- Aerotwist tutorials by Paul Lewis.
- Learning Three.js – A blog about learning three.js.
- Animated selective glow in Three.js by BKcore
Three.js News and Updates
- Three.js on reddit
- WebGL on reddit
- Learning WebGL Blog – The authoritative news source for WebGL.
- Three.js posts on Google+ – three.js posts more
Three.js Examples
- Three-seed — three.js startup project, using ES6 and Webpack
- Professor Stemkoskis Examples – A sample set that is friendly to beginners using three.js r60.
- Official three.js examples — These examples are maintained as part of the three.js repository and use the latest version of three.js.
- Official three.js dev branch examples — Similar to the above, except for the dev branch of three.js, which is also used for detection in three.js development.
Three.js Tools
- Physgl.org – The front-end JavaScript wrapper for three.js, primarily for students studying physics and mathematics in WebGL graphics.
- Whitestorm.js – a modular three.js framework with AmmoNext physical plugins.
- Three.js Inspector
- ThreeNodes.js.
Old Three.js Resources
These links have been preserved for some historical reasons – they may still be useful, but it’s important to note that they may depend on the fairly old version of three.js.
- AlterQualia at WebGL Camp 3
- Yomotsus Examples – Use the sample set of three.js r45.
- Introduction to Three.js by Ilmari Heikkinen
- WebGL and Three.js by Akihiro Oyamada (slideshow).
- Fast HTML5 game development using three.js by BKcore
- Trigger Rally by jareiko (video).
- ThreeFab – Scene Editor, maintained to three.js r50.
- Max to Three.js workflow tips and tricks by BKcore
- A whirlwind look at Three.js by Paul King